
Making sourdough bread
First steps……
Good bread is made from three ingredients: flour, salt and water. What distinguished good bread from bad is the method used to make it.
Making sourdough is all about perfecting the method. In most sourdough recipes the ingredients list is short – flour, salt and water - but the method is long and nuanced. Nuance comes in the form of subtle judgements you have to make along the way when considering the following:
• Is the starter is active enough?
• Has the dough been kneaded for long enough to develop gluten and create a ‘window pane’ effect when stretched?
• How long does the dough need to prove for before ‘knocking it back’?
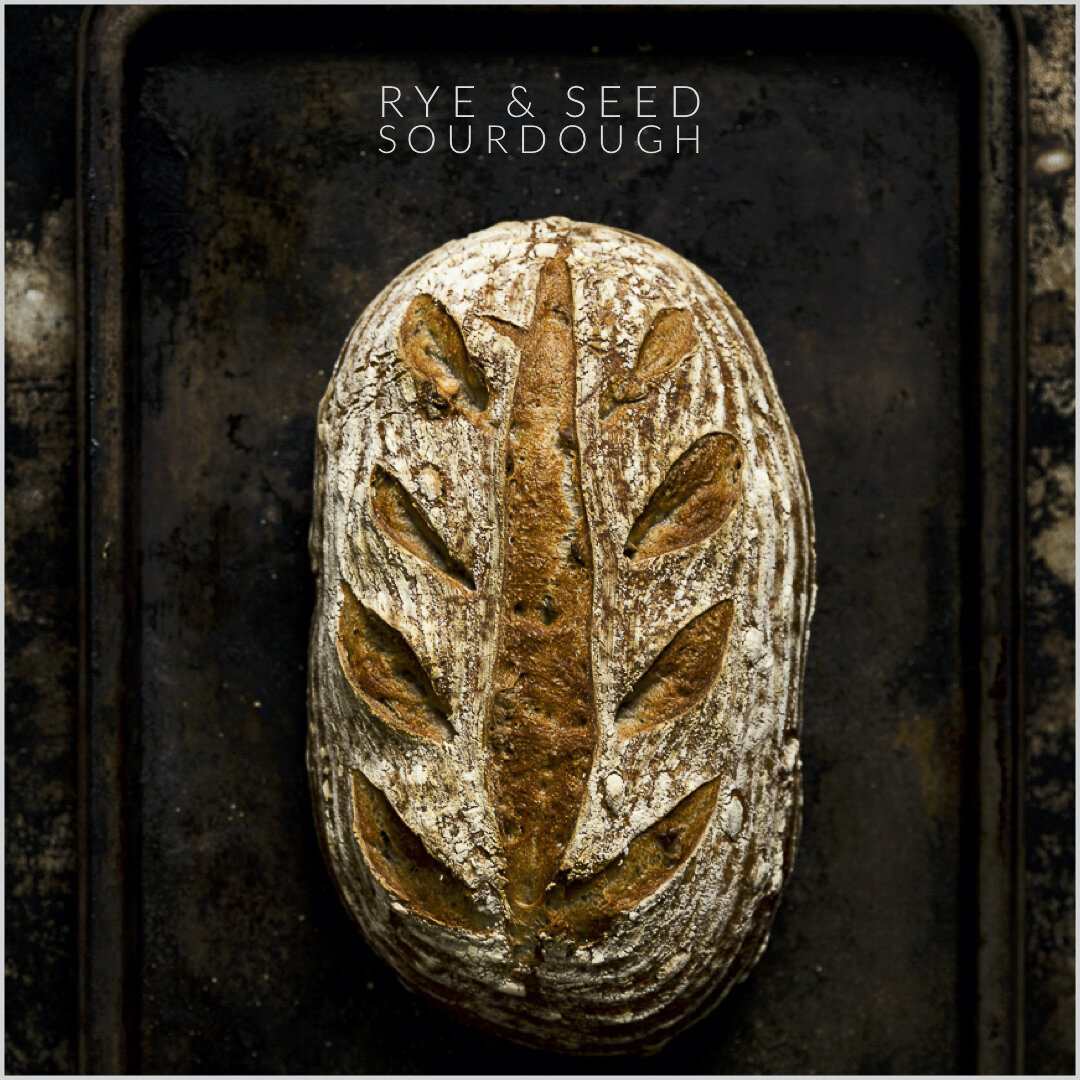
• How do I shape and slash the loaf to create the beautiful sourdough crust, shape and markings?
Each stage involved in making sourdough bread requires skill and a modicum of judgement which are acquired with practice and experience.
Time is a key factor…..
You have to be prepared to give time to making sourdough. ‘Hands on time’ – the time you actually spend weighing ingredients, kneading the dough and getting it oven ready - is about 20 minutes for two good sized loaves. However the whole process takes about a day from start to finish.
The first vital step is creating an active starter, without this the bread will not rise. Here are some instructions for making and maintaining a starter here.
Multi seed sourdough with rye and caraway seeds
This recipe is from Patrick Ryan at the Firehouse Bakery, Ireland and it works. I strongly suggest you watch this video of Patrick making the bread so you can see a demonstration of each stage of the process
Tip: Your sourdough starter should have been fed the day before so that it’s active, bubbling and rising in its container on the day you bake with it.
Ingredients
450g strong white flour
50g rye flour
10g salt
100g mixed seeds, caraway, flax, pumpkin, sunflower
325ml water
150g sourdough starter
Method
Add the strong white flour, rye flour and salt to a mixing bowl. Add the seeds to the bowl and mix all the ingredients through. Mix the water and sourdough starter together and then add to the flour and seeds.. Combine all the ingredients together to form a rough dough.
Turn the dough out on to a clean, smooth surface and knead for approximately 10 minutes or until the windowpane effect has been achieved (watch this carefully on Patrick’s video). The dough should be smooth, soft and elastic. When kneading, do not worry if the dough is slightly wet or sticky – use a plastic dough scraper to scoop up any dough stuck to the surface you are kneading on. Resist the temptation to add any extra flour. As you knead the dough the flour absorbs the water, the gluten develops and the dough becomes less sticky.
Return the dough to the mixing bowl, cover with cling film and allow the dough to prove for between 4 hours – 6 hours at room temperature (21°C+) .
TIP Successful proving depends on a warm environment. Cooler temperatures mean the dough will take longer to prove.
Three ways to know when your dough has proved.
If your dough is proving in a plastic bowl check around the sides for bubbles of gas
Dust a finger with flour and ‘prod’ the dough to make an indent. The dough should not spring back. The dents your finger made should remain in the dough.
With a sharp knife cut through a section of the dough and inspect the inside of the dough and you should see the stringy, gluten network.
When the dough has proved turn it onto a clean work surface and ‘degas’ or ‘knock the dough back’ by prodding it with your fingers until you have a flat, rectangular piece of dough which is now ready to shape.
To shape the dough into a tight round ball or loaf…….
I strongly recommend watching the video of Patrick Ryan shaping his loaves.
This is something worth taking time over. You need to create ‘tension’ within the loaf for it to rise well.
To prove & bake using a proving basket
Prepare a proving basket by lightly dusting with flour. Place the dough, seamed side facing up, into the proving basket. Loosely cover the proving basket with a clean tea towel and leave to prove for another 3 – 4 hours
Alternatively, the bread can be proved overnight in a fridge (about 2°C) . It will be ready to bake straight from the fridge the next morning. This is how I prove my bread and it works really well. You don’t have to be too precise about how long the bread has proved for in the fridge between 8 and 15 hours in the fridge will do. Just check it has proved by prodding with a floured finger. If the indentation remains the bread is proved and ready to bake.
To bake…….
Preheat oven to 230°C / 210°C fan assisted (445°F / Gas 8). Place a shallow baking tray into the bottom of the oven to preheat.
Carefully turn your dough out from the proving basket onto a baking tray dusted with flour (the domed side with the indentations from the proving basket should now be facing up and the seamed side on the baking tray).
Using a sharp knife cut the surface of the dough, this is what is known as the baker’s signature. The dough can be cut up to ½ cm deep. (This isn’t just for aesthetics, scoring the bread also helps control where and how it rises while baking).
Boil a kettle of water then pour the boiled water into the dish that was preheated in the bottom of the oven, this will create steam in the oven while baking.
Place the baking tray with the sourdough into the oven and bake for 30 to 35 minutes or until a good crust has formed and the loaf sounds hollow when tapped on the base.
Alternatively, if you do not have a proving basket, you can use a large glass casserole dish to prove and bake your sourdough.
In my next post I will show you what to do with left over sourdough starter. It is such a pity to throw it away.


